
The reason for the 3MA development starting in the late seventies in the German nuclear safety program was to find microstructure sensitive NDT techniques to characterize the quality of heat treatments, for instance stress relieve of a weld. The technique was sensitive for microstructure changes as well as for load induced and residual stresses. Therefore a second direction of research started in programs of the European steel industry and the objective was to determine residual stresses in big forgings.
A lot of the experience of 3MA over the past decades has been the determination of continuous mechanical properties of steel strips that are designed to make car body parts, and moving at speeds of 300 m / min, such as continuous galvanized and tempered production lines. Yield strength (Rp0.2), tensile strength (Rm), elongation, plane and vertical anisotropy parameters (rm, Δr) are main quality assurance measures, all of which normally are defined by destructive testing, thus continuous measurement is not possible. Therefore, through the successful application of 3MA technology, a substantial cost reduction and efficiency improvement have been achieved.
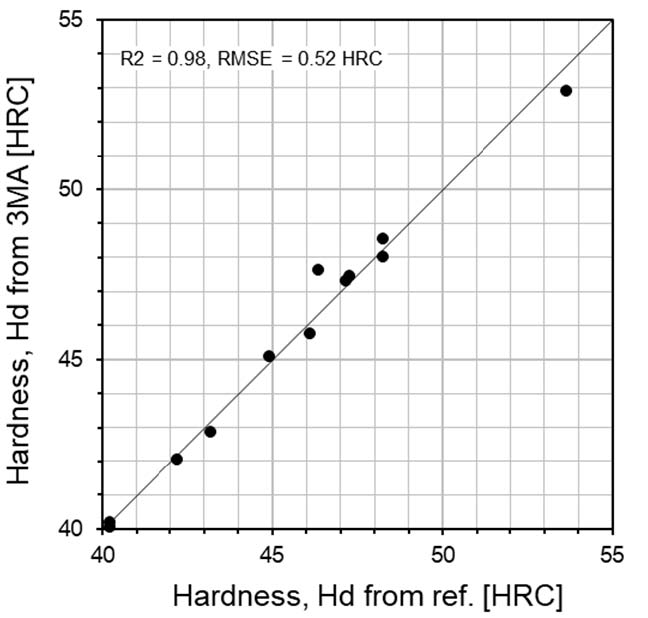
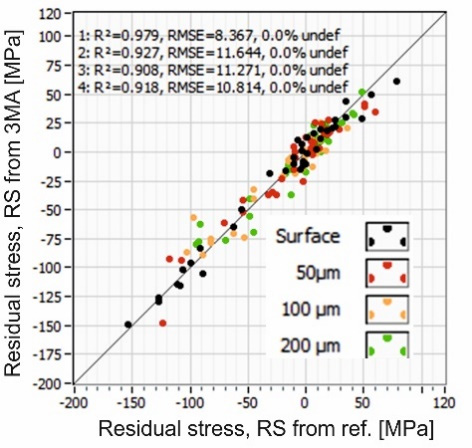
In later developments, the 3MA systems for inline strip steel testing were also calibrated to surface hardness and residual stress at different depths. These calibration results are shown in Figure below.
|
|
Results of the calibration to: (a) hardness and (b) residual stress at the surface and at depths of 50, 100 and 200 μm (all RMSE values in MPa).
Calibration to hardness and residual stress was made with different steel grades from tool and spring steels (75Cr1, CK75, 80CrV2), low and unalloyed steels (C55, C75), and heat-treatable steel (50CrMo4), providing hardness levels that were between 40 and 54 HRC (Rockwell hardness type C). Using X-ray diffraction determined the reference values for residual stress.
The different depths for the x-ray measurements were uncovered by electropolishing. Again, the measuring results from the calibrated 3MA system were compared with the results from destructive measurements. For hardness, the RMSE was in the range of 1 HRC. For residual stress, RMSE values that were between 1 and 47 MPa were determined, dependent on the steel grade and the measuring depth (see Table followed).
Table: Steel grades and results of verification measurements for residual stress.
| Steel Grade | Residual Stress, RS | |||
| At the Surface | At 50 um Depth | At 100 um Depth | At 200 um Depth | |
| RMSE [MPa] | RMSE [MPa] | RMSE [MPa] | RMSE [MPa] | |
| 75Cr1 | 47< | 1 | 3 | 4 |
| CrV2 | 15 | 1 | 9 | 31 |
| 50CrMo4 | 4 | 4 | 4 | 11 |
Based on these calibrations, the hardness and residual stress can be determined as a function of strip position. Figure below shows a typical example. At the beginning of the strip, strong variations of residual stress can be observed. The hardness is increased. After x = 60 m, the strip has calmed down, i.e., hardness and residual stress have reached their “normal” values.
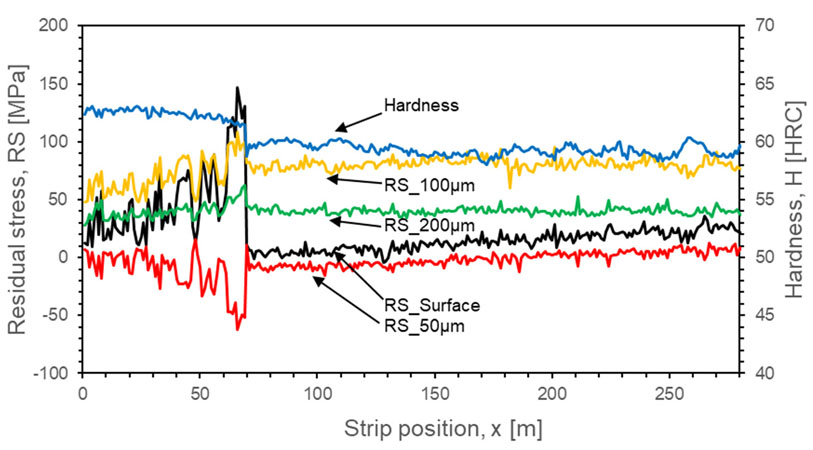
Figure: Inline measurement of hardness and residual stress at the surface and at depths of 50, 100, and 200 um
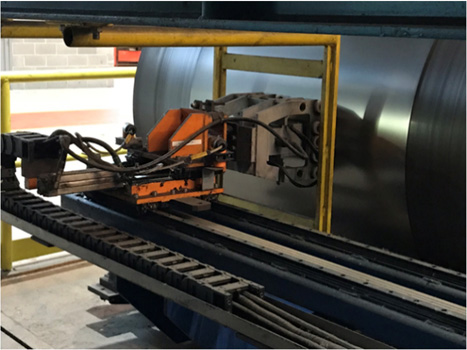
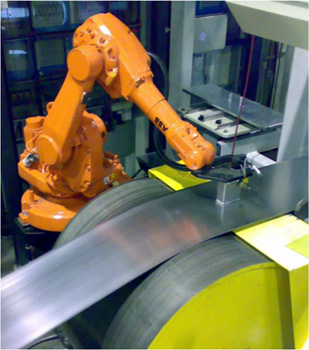
Meanwhile, a wide range of 3MA installations for inline strip steel inspection exists. Figure followed shows two of them. In the image of Figure on the left, the 3MA probe is applied above a large deflection roller. On the other side, the probe head may also be applied with a robot, as shown in Figure on the right. Meanwhile 3MA applications on hot strip, up to 300 _C can be realized, if the probe head is actively cooled with pressurized air. Other optimizations of the probe head design allow for a lift-off of up to 5 mm.
|
|
Further variants of 3MA probe head application on the running strip: (a) on a large deflection roller and (b) guided by a robot
Applications in the iron and steel industry, such as annealing after cold rolling of steel sheets on hot-dip galvanizing production lines, and thermomechanical rolling on wide and thick plate rolling mills, where special structures and structural gradients may exist. In the machinery manufacturing industry, especially in the area of raw materials for the automotive supply industry, there are also increasing cases of 3MA technology applications. For more information, please contact LAB GAGES, or go on to visit our 3MA series Nondestructive Testing Systems Product Center.

311,Building 5,No.81,Meiyue Road,Waigaoqiao Free Trade Zone,Pudong,Shanghai,China
amy@labgages.com
021-50473900


About LAB | Cooperative Brand | Contact us | Sitemap

滬公網(wǎng)安備 31011502000213號

 滬ICP備12021537號-1
©2012-2024 LAB GAGES