
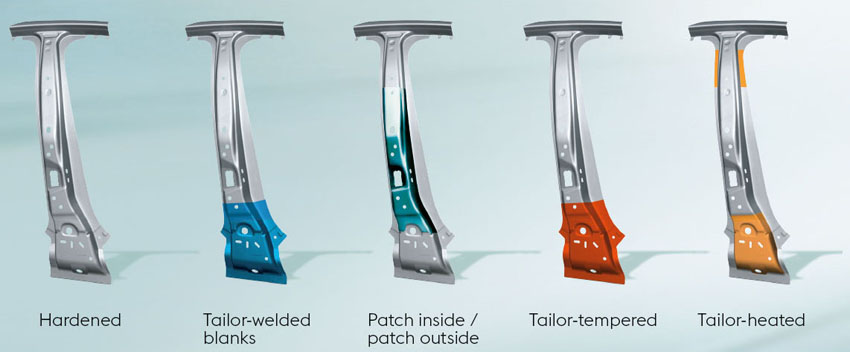
It is well accepted that the use of hot-stamped steel or Press-Hardened Steel (PHS) in reinforcement elements of the car body structure offers the possibility for significant reduction of vehicles’ weight at moderate costs. However, the production of PHS parts is also very challenging. Today, OEMs and suppliers offer a broad range of PHS products that are based on tailored steel properties and adapted coating systems, including monolithic and patched blanks, tailor tempered blanks (TTB), tailor welded blanks (TWB), and tailor rolled blanks (TRB). For that reason, there is a high demand for methods that allow for the precise monitoring of the PHS production process in order to maintain it to fixed targets and to ensure that PHS products in all variants meet the high quality requirements. This is crucial for the automotive industry in order to maintain and improve its competitiveness in a global market.
|
|
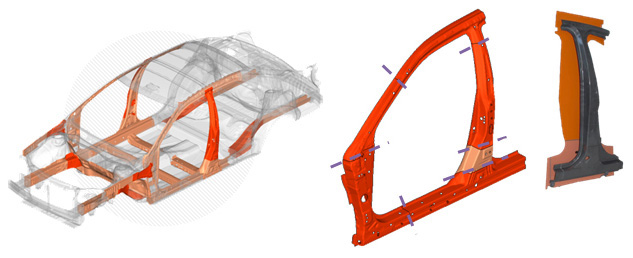
Examples of car body strengthen AHSS hot forming components
The mechanical properties of the PHS are adjusted not in the steel plant during the process, but only afterwards during hot forming. In order to meet the material specifications, all process parameters during heating, forming, and quenching must be kept within strict tolerance bands. Nevertheless, process disturbances, such as furnace malfunctions, wear on the pressing tool, or breakdown of the cooling circuit in the press could affect the material quality. Deteriorated material properties could also result if the heated blank cools down too fast during transfer between the furnace and press. In the case of AlSi-coated blanks, a complicated coating layer structure is developed in the furnace. In order to achieve the optimum press-hardening results and paint adhesion, this layer structure has to meet strict specifications.
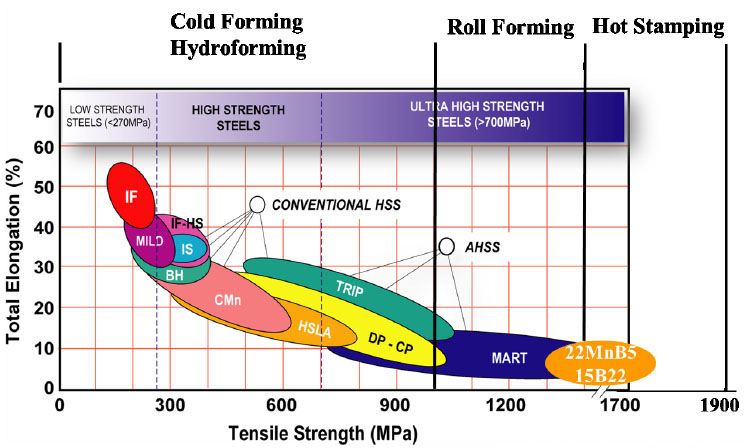
Tensile strength-Total alongation distribution of Press hardening sheet and automobile hot forming HSS steel 22MnB5/15B22
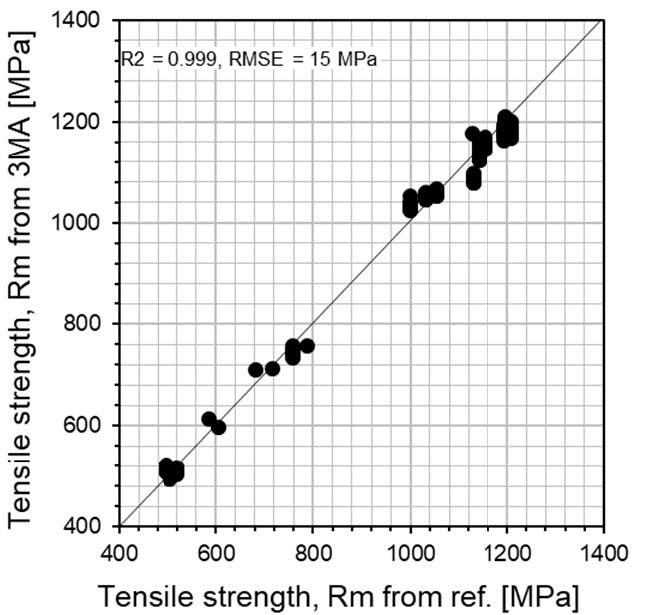
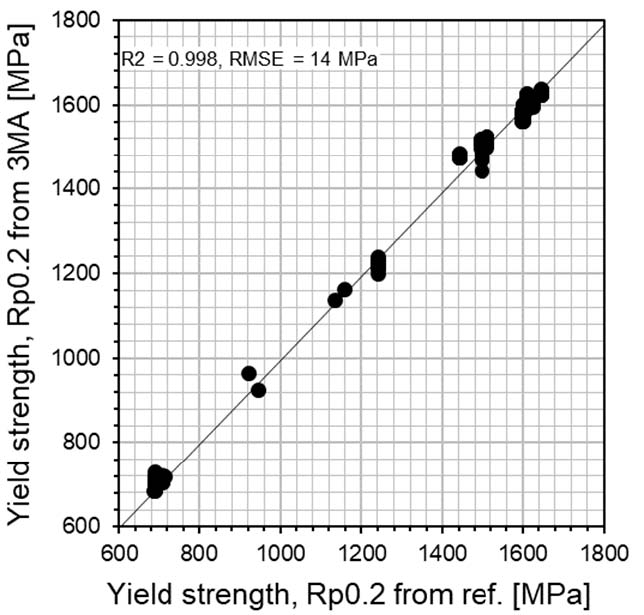
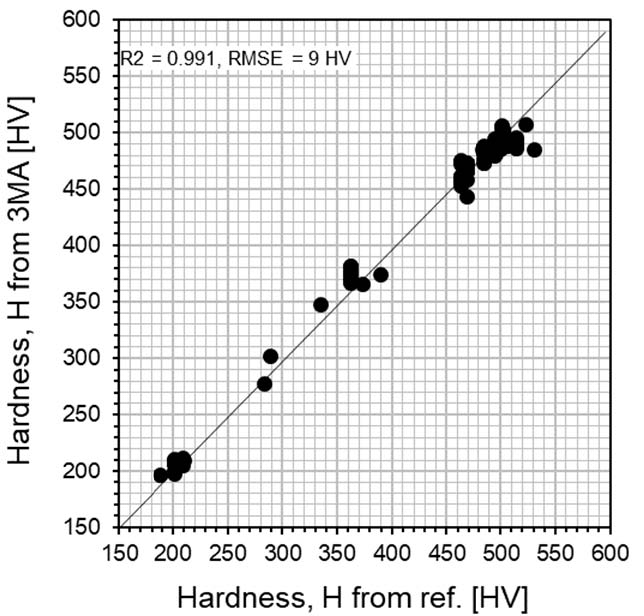
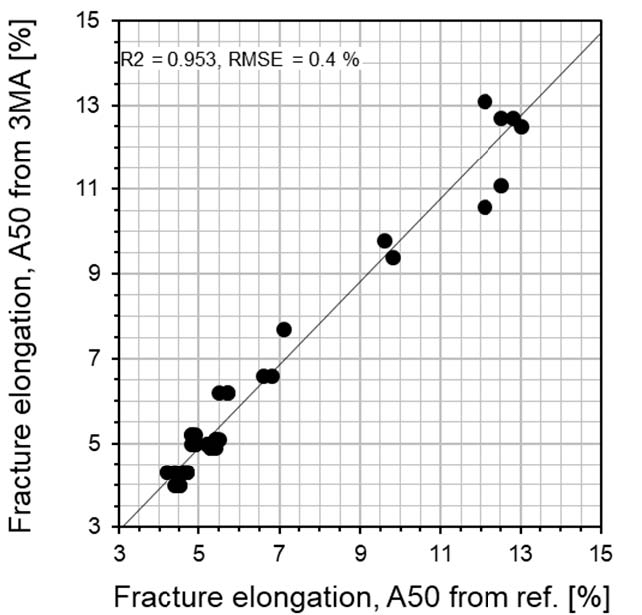
The application possibilities of 3MA for quality assurance and process monitoring in PHS production have been researched, since the first use of PHS in large-scale automotive production in 2004. Based on the calibrated 3MA technique, quantitative values of hardness, tensile strength (Rm), elastic limit (Rp0.2), fracture elongation (A50) and uniform elongation (Ag) of the PHS material can be determined. The 3MA calibrations are generally steel-grade specific. Thus, different calibration functions for the hardenable and the nonhardenable parts in a TWB have to be used. Additionally, each coating type requires an individual calibration. The diagrams in Figures below show the result of a calibration for an aluminum–silicon (AlSi)-coated steel of grade 22MnB5. Usually, for hardness and Rm, the 3MA parameters provide the best correlations.
|
|
|
|
Results of the calibration for the mechanical properties in AlSi‐coated Press‐Hardened Steel (PHS): (a) tensile strength and (b) yield strength (c) hardness and (d) fracture
To a lesser extent, the steel sheet thickness also influences the 3MA signals. Therefore, two separate calibrations for sheet thicknesses that are smaller and larger than 1.0 mm have proved to be beneficial. On the other hand, it was shown that batch or supplier variations have no detectable effect on the calibration function.
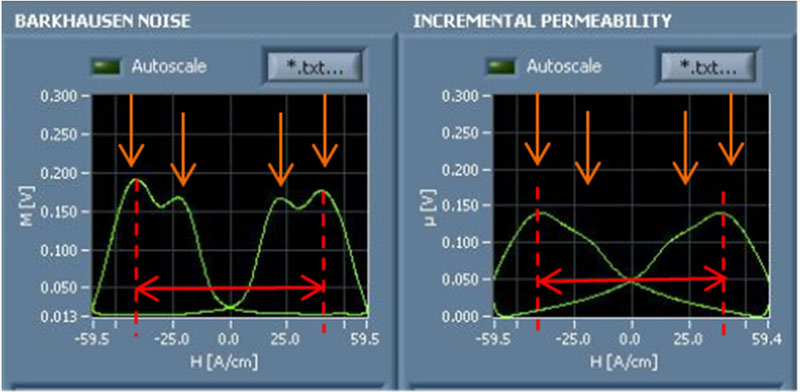
Barkhausen Noise (BN) signal (left) and IP signal of an AlSi‐coated PHS part; the characteristic double‐peak structure is clearly visible.
The widespread AlSi coating often develops a layer structure with a diffusion layer that consists of ferromagnetic Al–Fe phases. Besides the streel substrate, this diffusion layer will produce a second contribution to the 3MA signals, which is distinguishable from the steel’s signal contribution. This is shown in Figure above.
|
|
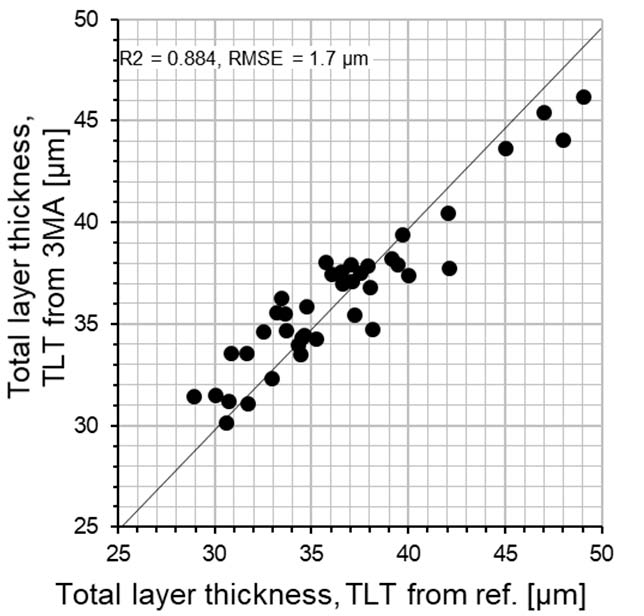
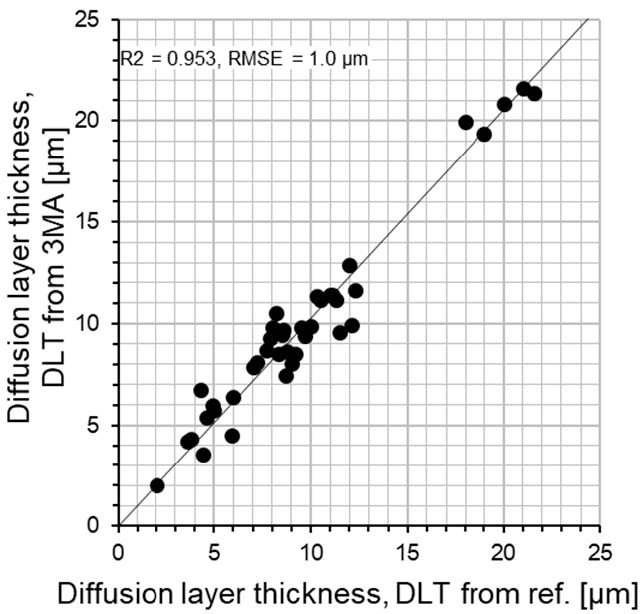
The Barkhausen Noise (BN) signal and, to some extent, the Incremental Permeability (IP) signal show a characteristic double-peak structure. When comparing the measurements on coated and uncoated sheets have shown that the outer peaks, appearing at higher magnetic fields H, are generated by the steel substrate, whereas the inner peaks at lower fields H result from the ferromagnetic diffusion layer. The height of the inner peak is dependent on the amount of this diffusion layer. Therefore, some of the 3MA measuring parameters are correlated to the diffusion layer thickness (DLT). Moreover, there are also 3MA measuring parameters that are dependent on the lift-off between the 3MA probe and steel substrate. These parameters can be used to determine the total thickness (TLT) of the AlSi coating. The values of DLT and TLT are relevant for the further processing of the PHS parts, because they affect weldability and paintability. The AlSi coating is burned into the steel during a time-consuming furnace process. During this time, the diffusion layer is developing. Therefore, the values of DLT and TLT are important measures for controlling the proper processing in the furnace. For these reasons, PHS producers also are very interested in measuring these coating properties. This is possible with 3MA, as is shown in the calibration diagrams of Figure below. The accuracy (RMSE = 1.0 um and 1.7 um) is sufficient in order to evaluate coating quality.
|
|
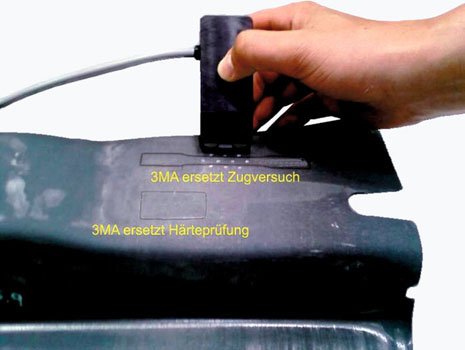
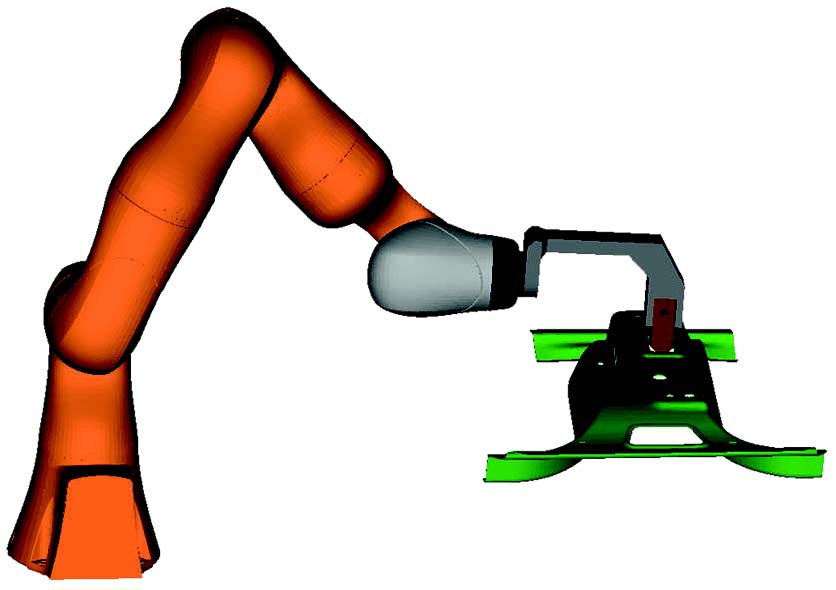
Versatile 3MA systems for nondestructive testing of mechanical properties of press hardening parts: Manual and Automated
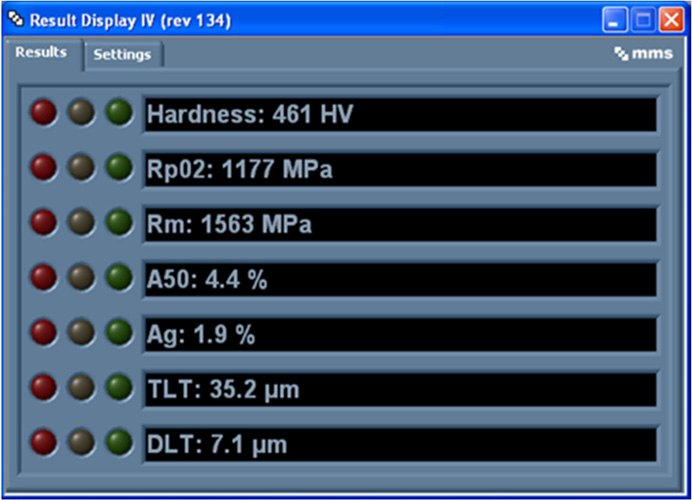
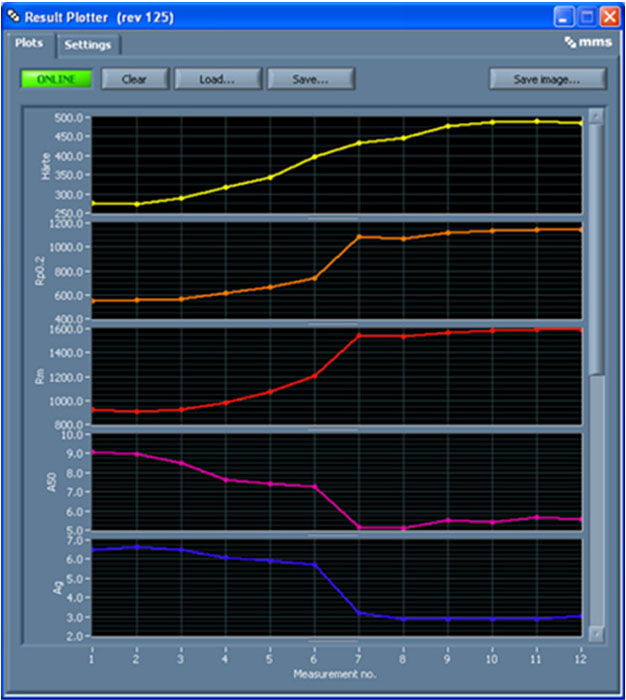
This is shown in left Figure above, which is a screenshot of the 3MA results that re displayed after a measurement on a PHS part. The measuring time was only three seconds. Due to the fact that the field-of-view of the 3MA probe is only a 1–2 mm in diameter, 3MA can be used to inspect sharp transitions of material properties, as they are preferred in tailor tempered blanks (TTB). The development of hardness and other mechanical properties in such a sharp transition can be detected with 3MA, as shown in right Figure above. Such measuring profiles of hardness, Rm, Rp0.2, etc., cannot be determined by conventional destructive testing methods. Therefore, 3MA offers additional information that is not available from destructive tests. 3MA can be manually applied in PHS production. Meanwhile, automated 3MA systems that are based on conventional or collaborative robots have been developed.
|
|
If the PHS should be laser welded, the aluminum–silicon coating could be a problem. Therefore, the coating is partially ablated by laser. Again, the 3MA technique can be used in order to verify the success of the partial ablation by determining the thickness of the residual coating layer. Meanwhile, PHS testing is the typical 3MA technique application by far. Almost all of the PHS-producing OEMs and suppliers from the automotive industry use 3MA technique.
For more information, please contact LAB GAGES, or go on to visit our 3MA series Nondestructive Testing Systems Product Center.

311,Building 5,No.81,Meiyue Road,Waigaoqiao Free Trade Zone,Pudong,Shanghai,China
amy@labgages.com
021-50473900


About LAB | Cooperative Brand | Contact us | Sitemap

滬公網(wǎng)安備 31011502000213號(hào)

 滬ICP備12021537號(hào)-1
©2012-2024 LAB GAGES